When my kids were younger, they always wanted unique valentines to give their friends at school. This pattern is one for traditional Danish hearts that are usually made with felt. These are unique because they open at the top of the heart and you can put candy and messages inside. I made these from scrapbook paper, but I'm sure construction paper would also work well.
To get started, you need to make a template of a long oval that looks like this and measures approximately 4" wide and 10" long. The greater the length, the deeper the inside of the heart.
Find a coffee cup or small bowl that is a circle 4" across (diameter). Trace half of the circle on cardstock. Using a ruler at the widest part of the left and right sides of the semicircle, draw a line down 10". Place the cup between the ends of the lines to make the other end a semicircle. Now you have your template.
Using the template, cut two ovals from your paper for each valentine. I decided to use red and pink papers. Stack one oval paper on top of the other and fold them in half so the rounded ends are together.
Beginning on the fold, cut three vertical lines upward toward the rounded ends, stopping about 1" from the top of the curved end. The three lines should be generally evenly spaced, so start in the center of the fold and then cut a line on either side. If you want to measure and draw, that's fine; however, after you do a few, you will learn you can just eye it and cut. It should look like this when you take the papers apart:
Now the weaving begins. Start with the papers folded and positioned like this:
Referring to the picture, the first pink strip will weave THROUGH the first foldedvred strip and then AROUND the next red strip and so on. It's a little hard to do at first, but don't be afraid to bend and twist the strips to get them weaved together. They won't tear.
Once you get the first pink strip weaved into the red strips, you will move on to the second pink strip. With each new row of pink strips you weave, you will want to slide the whole pink side up and to the left toward the curve of the red side. This will create room for you to weave the next strip. Start the second row by inserting the first red strip THROUGH the pink one (that's the opposite pattern from the first pink strip). This will create the checkerboard look.
The third pink strip is woven just like the first. See how the pink side of the heart is sliding upwards and left toward the red curve? It's important to keep shifting it in that direction, especially as you get to the last pink strip to weave. After you weave each strip, make sure they are straight and lying flat.
The last row is like the second.
Here's the last important step. To finish, you want to hold the curved end of red in one hand and the curved end of the pink in the other. Gently pull them up and out to get the weaved strips to lay flat and fit snugly together with no gaps. You should notice by now that you have been treating the red and pink sides as flat one-dimensional shapes. Now that you are finished, you can open the heart and see the inside pocket:
Because my papers are only printed on one side, the inside of my hearts are white. If you use construction paper or other paper with two colored sides, you will see the woven colors inside the heart. This is where you can put candy or little notes for your valentine.
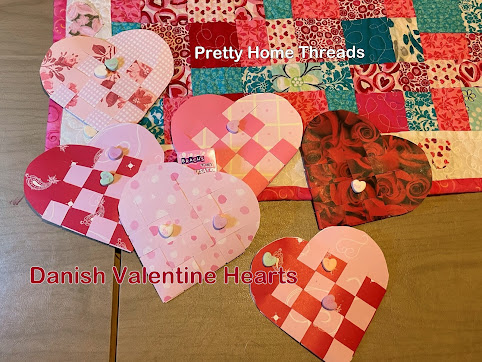
Most of the hearts I made used two different patterns of paper, but in the next picture you can see what it looks like when you use the same pattern of paper for both sides of the heart. If you like that checkerboard look, be sure to use high contrast designs like the second picture.
Once you learn how to make these, you can enlist your kids to help. It's a great kid craft that uses no glue and uses only a few pieces of paper. Years ago, I made 30 of these for my daughter's class and she enjoyed writing inside and stuffing them with candy.
Whatever you do for Valentine's Day, make it fun for the whole family!
cindy


Comments
Post a Comment