Easter Paper Piecing Pillow Tutorial - Part 1
Have you tried paper piecing? I created this fun Easter pattern using a combination of paper piecing to incorporate multiple fabrics, as well as applique, trims and hand embroidery to embellish the paper pieced eggs on the pillow cover. Because there are a lot of steps, I'm providing this tutorial in 2 parts. Part 1 includes basic instructions on paper piecing and Part 2 will show you ways to embellish the eggs with applique and hand embroidery.
Each egg uses several fabrics, but this is a great project for your remnant stash.
This post will show the basic paper piecing technique, but the complete pattern will take you through each egg, including the one with the chick. You can find lots of other paper piecing patterns on Pinterest. I will be using the egg in the top of this picture to show you how to paper piece.
For each egg pattern, mark the lines with a dark pen so it shows through to the other side. You also want to number the order you will attach the fabrics on each line. I use plain copy paper, but you can also use freezer paper or tissue to create the paper patterns.
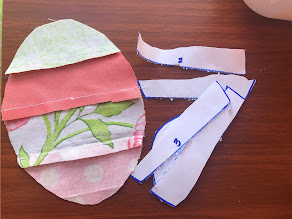
1. Flip the paper pattern over so the back side is up. When completed, the right side of fabric egg will be covering the wrong side of the pattern. Cover the first section with a piece of fabric, right side up, making sure to slightly overlap the first line so you have a seam allowance. The second picture shows the second fabric piece laying over the first, right side down. You can see in the second picture where I marked the location of the first line under the fabrics so you can see how you need to leave enough fabric for a seam allowance. When choosing your second fabric, be sure it is large enough to cover the second section between lines 1 and 2. Pin both fabrics to the paper.
2. Flip the pattern with attached fabrics over so the right side of the paper pattern is showing. Sew a straight seam following the horizonal line marked 1, through the paper and fabrics. Flip back to the wrong side of the pattern and open the fabrics so you see the right side of each fabric, using your finger to press the seam open. Trim the seam allowance.
3. Repeat the process with fabric for the third section, laying the next piece of fabric onto the second fabric, right sides together. Flip it back to the front and sew onto the paper on line 2. Please note in the picture above, the fabric is already sewn on at line 2 and opened on the other side. After taking this picture, I cut the fabric to match the contours of the egg and so the bottom of the fabric is just below Line 3. See next picture for other side after cutting.
4. Repeat with last fabric, laying it onto previous fabric, right sides together. Flip to front, sew onto the paper on line 3 and then press the seam open with your fingers. Trim all fabrics around the perimeter of the egg.
6. The above pictures are the "before" and "after" of the same egg. Once you rip away the paper, you have the "wrong" side. Iron well.
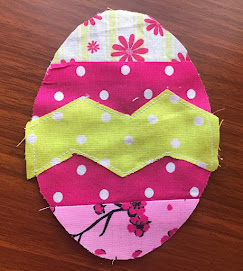
7. The second egg with the zig-zag stripe uses paper piecing as the foundation of the three background fabrics (first picture - wrong side of egg). The zig-zag stripe is created by cutting a piece of fabric from the zig-zag pattern and sewing it directly onto the right side of the egg. The edges are unfinished, but we will follow up with some hand applique embroidery to cover the raw edges.
8. The "chick" egg is made with four separate pattern pieces that aren't paper pieced. I sewed the bottom of the egg directly onto the body of the chick by laying the "egg" piece on top of the right side of the chick body. The head and the upper egg will be attached after ironing stabilizer on the back of each fabric piece so they can be attached to the pillow cover.
9. The third egg was created by paper piecing the diagonal fabrics. Once you have constructed the three eggs and pieces for the chick, use a 2-sided stabilizer like Pellon by laying the pieces onto the stabilizer, cutting it out to match the fabric pieces, and then ironing the fabric onto the stabilizer. Gently peel the paper backing off the stabilizer. The second picture shows the wrong side of the fabric pieces after peeling the stabilizer from the back.
9. I attached these paper-pieced eggs onto a pillow cover I made from cotton fabric using my Envelope Pillow pattern (available for free on this blog). I made a 14" pillow cover, so cut the appropriate size of fabric and fold and mark the fabric with pins so you can see the front panel. (Don't sew the pillow cover together until you have completed the egg decorations.) Lay out your 4 eggs, leaving at least 1.5" at the top and bottom for seam allowances. Iron on each piece, including the 3 separate pieces for the chick.
That's all of Part 1 - paper piecing. In 2 days I'll post Part 2 where I show you how to use applique, trim and hand embroidery to embellish the eggs and cover raw fabric edges.
Happy Easter!
cindy


Comments
Post a Comment